
本文章介紹基本的合併流程, 以Subclipse為例
在要合併的目錄, 可以由 Team --> 列出Subclipse所有功能

假設bdp是trunk project, bdp2是branch project

1.首先將新專案bdp2分支 Trunk > Branch

2.Branch開發到一半, 若要跟Trunk合併, 這時要選擇bdp2(也就是branch的project)按右鍵,
選Team -> 合併 ->
選擇 Merge a range of revisions

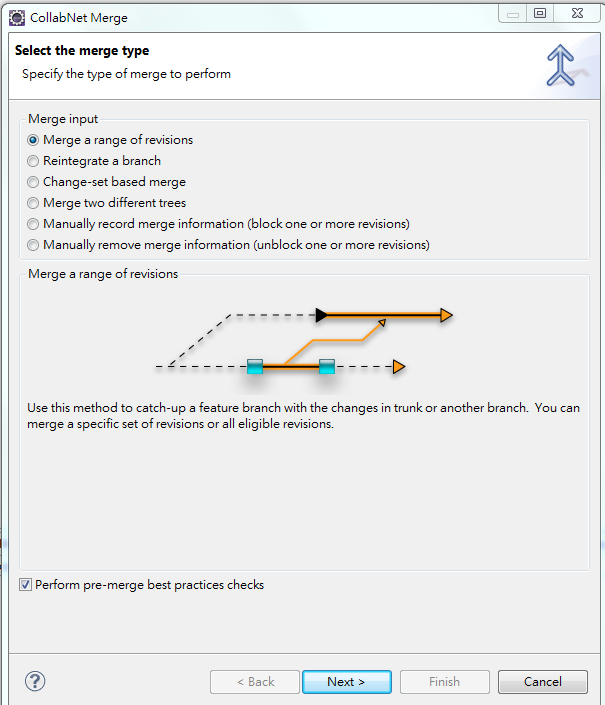


3.開發完成後, 要回主線 Trunk < Branch, 這時要選擇bdp(也就是trunk的project)按右鍵,
選Team -> 合併 ->
選擇 Reintegrate a branch

4.選擇要回去的branch的同階目錄(若從WebContent開始合併, 就指到branch的WebContent)


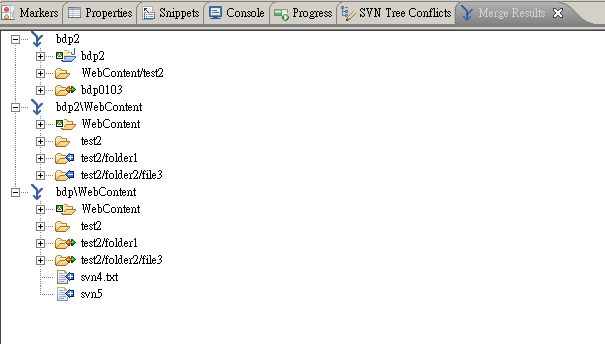
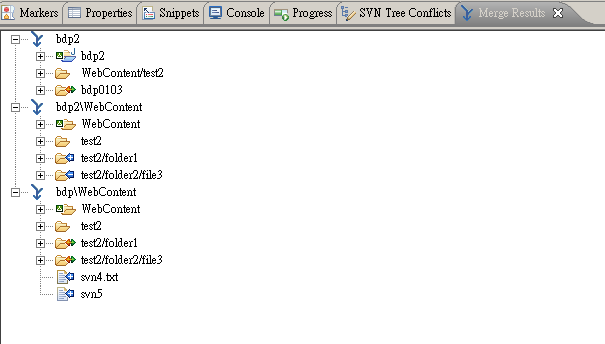
5.每次合併的結果, 可從 Merge Results Tab查看
--
Subclipse圖示的解釋
(圖示出處: http://stackoverflow.com/questions/3917925/what-do-the-arrow-icons-in-subclipse-mean
Subclipse圖示的解釋
(圖示出處: http://stackoverflow.com/questions/3917925/what-do-the-arrow-icons-in-subclipse-mean
 - A file ignored by version control. You can control what resources will be ignored by going to Window → Preferences → Team → Ignored Resources.
 - A file not under version control. These are typically new files that you have not committed to the repository yet.
 - A versioned file that needs to be added to the remote repository. These are typically files you have either renamed, or moved to a different directory.
 - A deleted folder. These are folders that you have deleted locally without yet committing the changes to the repository. Note that files are usually removed from the view when they're deleted locally, so they are normally not seen with this icon.
 - A file with no local changes.
 - A file with local, uncommitted changes.
 - A locked file.
 - A file that needs a lock to be edited. These are typically files that cannot easily be merged (i.e. binary files), but may have many editors. A file needs a lock when its
 svn:needs-lock property is set, and Subversion will attempt to make these files read-only in the file system to enforce proper lock negotation. - A conflicted file. These are typically files that had a commit/update conflict that you marked to resolve later.
 - A file that has a tree conflict. These are typically files that have local changes, but have since been moved, removed, or renamed in the repository since the last local copy update.
 - A file that is external to the project. Linked external files cannot be committed to the repository.
 - A file that has been switched. These are files which belongs to a different working copy than their local parent directory.
In a synchronization view (e.g. via Synchronize with Repository or Commit), as previously described, there are icons which indicate which direction a change is occurring in as well as additional information about that change. These are described below:
Outgoing
 - A file whose contents have been modified and will be committed to the repository.
 - A file that will be newly added to the repository. This may coincide with a file removal in cases where a file is moved or renamed..
 - A file that will be removed from the repository. This may coincide with a file addition in cases where a file is moved or renamed.
 - A file with property changes, in the Commit dialog. On the Synchronize tab, property changes are currently reflected as a normal file modification ().
- A file whose contents have been modified and will be committed to the repository. - A file that will be newly added to the repository. This may coincide with a file removal in cases where a file is moved or renamed.. - A file that will be removed from the repository. This may coincide with a file addition in cases where a file is moved or renamed. - A file with property changes, in the Commit dialog. On the Synchronize tab, property changes are currently reflected as a normal file modification ().由合併的目錄, 會記錄合併後相關訊息(svn:mergeinfo)
以trunk合併branch情境來看
假設 trunk/WebContent merge branch/WebContent
原本上次合併是由 100 ~ 120, 目前最新版本是121, 合併後也會記錄一個版本, 所以會變成122, 那麼mergeinfo這檔案就是記錄100 ~ 122版本, 但重點是我們還沒有commit
所以此訊息會提示, 我們上次commit是100 ~ 120, 合併後版本變成 100 ~ 122, 它希望我們能commit這版本
為了要記錄這次合併的版本, 所做的提示(因為我們可能在下一階又commit其他變動)
Incoming
 - A file that has content changes committed to the repository that will be applied to the local copy.
 - A new file that will be added to the local copy from the repository. Like the outgoing file addition, this may be the result of a move or rename.
 - A file that will be removed from the local copy because it has been removed from the repository. Like the outgoing file removal, this may be the result of a move or rename.
- A file that has content changes committed to the repository that will be applied to the local copy. - A new file that will be added to the local copy from the repository. Like the outgoing file addition, this may be the result of a move or rename. - A file that will be removed from the local copy because it has been removed from the repository. Like the outgoing file removal, this may be the result of a move or rename.
Conflict
 - A file that has been changed in both the local copy and repository independently, causing a need for conflict resolution. Fixing this condition involves opening up the conflict view or forcibly overwriting changes locally or remotely.
- A file that has been changed in both the local copy and repository independently, causing a need for conflict resolution. Fixing this condition involves opening up the conflict view or forcibly overwriting changes locally or remotely. - A file that has a tree conflict. This can occur when there are new changes to a file on one end (either local or remote), and the file is moved, removed, or renamed on the other.
Finally, the Synchronize with Repository option opens the Synchronize tab ( ) with the following buttons:
) with the following buttons: - Synchronizes the local copy with the currently selected repository when clicked. Selecting from the drop-down allows switching between different remote code bases.
 - Shows only incoming changes (remote → local).
 - Shows only outgoing changes (local → remote).
 - Shows both incoming and outgoing changes (remote ↔ local).
 - Shows conflicting changes.
 - Updates all local resources with incoming changes after prompt.
 - Brings up the commit dialog to commit all outgoing changes.
 - Breaks up the change lists by revisions.
Conflict
Delete:只要是目錄有變動, 都算是
Add:
Edit:
Local:本機修改
Incoming:是别人修改, 你要Update或Merge進来
Tree Conflict
Local delete, incoming edit upon update
Local edit, incoming delete upon update
Local delete, incoming delete upon update (二邊都刪掉, 直接標記解決就行)
merge情況
Local missing, incoming edit upon merge
Local edit, incoming delete upon merge (當trunk合併branch, 若trunk修改此檔案, 但trunk刪除時)
Local add, incoming add upon merge (當branch回trunk, 若truck已有此檔案, 但trunk也新增)


Local edit, incoming delete upon update
Local delete, incoming delete upon update (二邊都刪掉, 直接標記解決就行)
merge情況
Local missing, incoming edit upon merge
Local edit, incoming delete upon merge (當trunk合併branch, 若trunk修改此檔案, 但trunk刪除時)
Local add, incoming add upon merge (當branch回trunk, 若truck已有此檔案, 但trunk也新增)
測試:
Local delete, incoming edit upon update


最好是每次合併後, 都檢查一下是否有 Tree Conflict, 因為不是每次都有提示